Authentication
Doc Gen uses OAuth 2.0 for authentication. You register an API client in Doc Gen, which gives you a client ID and a client secret, and you use them to get a bearer token for every API call. You can also register a certificate thumbprint and use mutual TLS (mTLS).
Create an API client
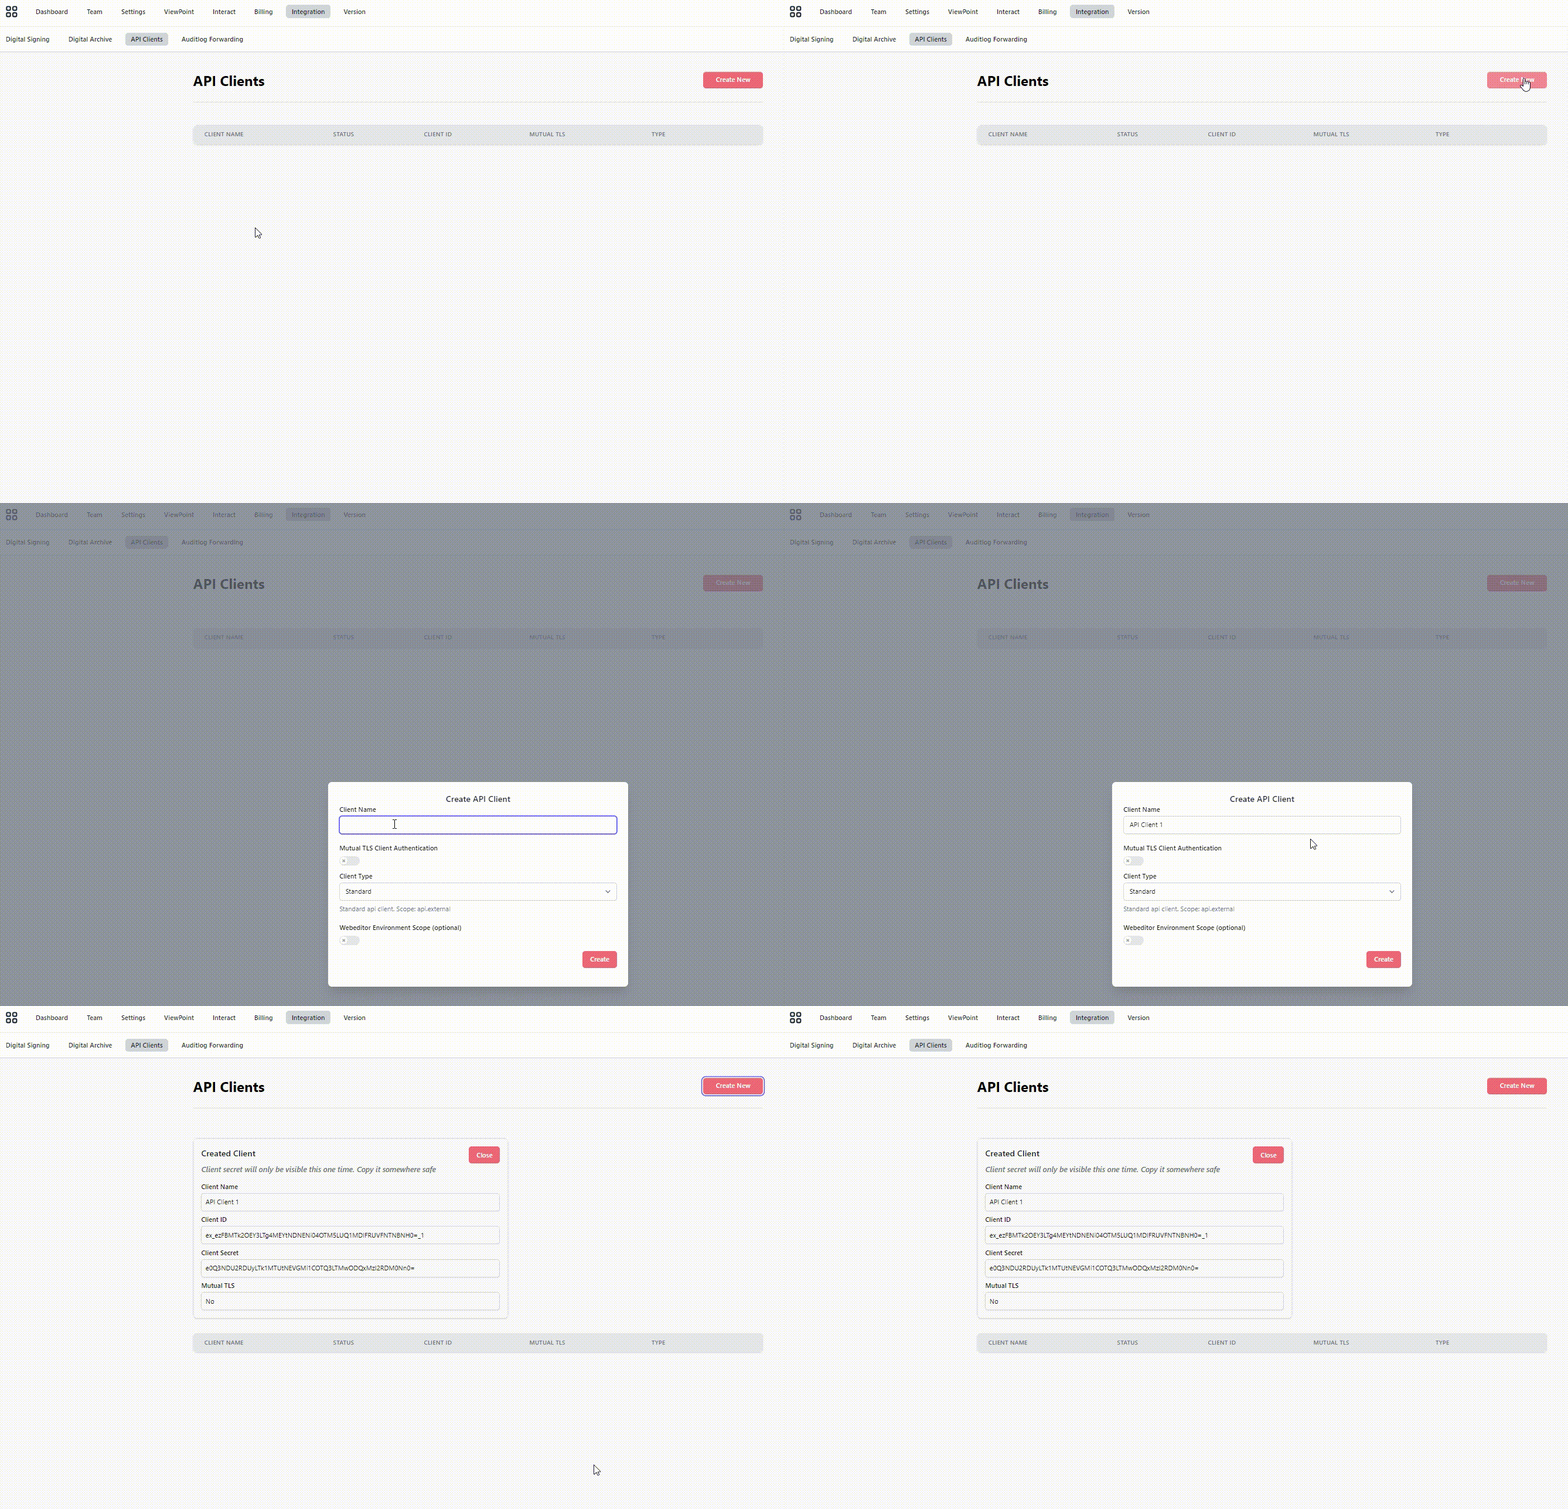
- Open the Admin application and go to Integration, then API Clients. The list shows each client with its Client Name, Status, Client ID, Mutual TLS and Type columns. Status is Enabled or Disabled.
- Click Create New.
- Enter a Client Name, for example
Nordic Demo Integration. - Turn on Mutual TLS Client Authentication only if you authenticate with a certificate. Then enter the Certificate Thumbprint, a hexadecimal SHA1 (40 characters) or SHA256 (64 characters) value.
- Pick the Client Type. The text under the field shows the scope of that type. See Client types.
- Turn on Webeditor Environment Scope (optional) to add a Pages environment scope to the client, and pick the Webeditor Scope: Development, Test, Stage, Demo or Production. You need it only when the Pages environment you call requires that scope, see Webeditor scope.
- Click Create. Doc Gen shows a Created Client card above the list with the Client Name, Client ID, Client Secret and Mutual TLS setting.
📝 Note: The client secret is shown only once. Copy it and store it safely before you close the card. To close it, click Close, then click Confirm within three seconds.
To stop a client from getting tokens, open its row menu and choose Disable. Enable turns it on again. Delete asks Do you want to delete this API Client? and removes the client when you click Confirm.
Client types
The Client Type decides which scope the client gets. Ask for that scope when you request a token.
| Client type | Scope | Use it for |
|---|---|---|
| Standard | api.external | Smartforms, Text Library and Pages calls from your own systems. A Standard client also gets access to Workflow. |
| External System | api.integration_customer | Third party systems such as Salesforce. The scope is limited. |
| Audit | api.audit | Posting audit log events only, see Audit API. |
| MetaTool | api.metatool | Creating MetaTool documents only. |
A call with a missing, invalid or expired token gets 401. A valid token without the scope the call needs gets 403.
Webeditor scope
A Pages environment can require its own scope next to api.external. The client gets the scope that matches the Webeditor Scope you picked:
| Webeditor Scope | Scope name |
|---|---|
| Development | webeditor.dev |
| Test | webeditor.test |
| Stage | webeditor.stage |
| Demo | webeditor.demo |
| Production | webeditor.prod |
The token request must ask for both scopes, separated by a space, for example scope=api.external webeditor.test. A Pages call to an environment that requires the scope is answered with 400 and the message (022) Invalid scope '...' for the environment ... if the token does not have it. MetaTool calls do not check this scope.
Postman
Postman is a well known tool for testing a REST API. The examples in this section can be tried in it.
Authorization
Every API call needs a bearer token. This section assumes you have a client ID and client secret from the Admin application.
The token endpoint
Post your client credentials to /connect/token on the identity host:
POST https://identity-v2.metaforce.net/connect/tokenYou can rely on this path. We are moving Doc Gen onto Keycloak, which organises its OAuth endpoints
differently behind the scenes, but the identity host keeps accepting /connect/token and routes it
to the right place. Integrations written against this URL keep working through the move, and nothing
else about authentication changes either: same client id and secret, same client_credentials
grant, same scopes.
Ask for a token when you need one and hold on to it until it expires rather than fetching a fresh
one per call. The response tells you how long it lasts in expires_in, normally an hour, and the token
is sent on every call as Authorization: Bearer <access_token>.
Postman
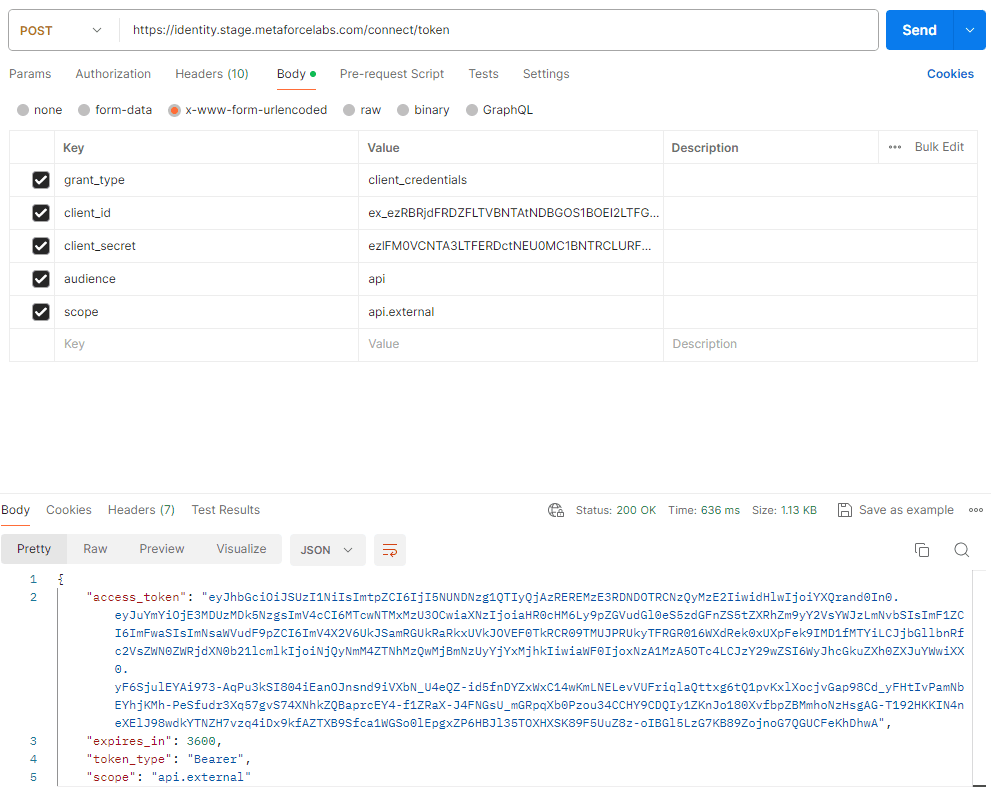
This example gets a bearer access token in Postman. Fill in the body as shown (remember it is a POST) to get the token, then use it in the calls that follow.
Javascript
This JavaScript example uses the client ID and client secret to get a bearer token for later calls.
const axios = require('axios').default;

async function main(args) {

  var client_id = 'ex_e0JBQ0I3NTQyLUE1NzgtNDI0Nixxxxxxxxxxxxxxxxxxxxx';
  var client_secret = 'ezMzMjA2MTU5LTRGNTktNDM5Mi0xxxxxxxxxxxxxxxxxxx';

  var scope = 'api.external';
  var authHeader = 'Basic ' + Buffer.from(client_id + ':' + client_secret).toString('base64');
  const tokenOptions = {
      method: 'POST',
      url: 'https://identity-v2.metaforce.net/connect/token',
      headers: { 'content-type': 'application/x-www-form-urlencoded', 'Authorization': authHeader },
      data: 'grant_type=client_credentials&scope=' + scope
  };

  try {
      var tokenResponse = await axios.request(tokenOptions);
      const accessToken = tokenResponse.data.access_token;

      // Set the Authorization header for subsequent requests
      axios.defaults.headers.common['Authorization'] = `Bearer ${accessToken}`;

  } catch (error) {
      console.error('Error:', error.message);
  }
}
main();