Action
The Action panel lets you manage your Smartform and control how it is used.
From here, you can publish, activate, preview, and test your Smartform.
Open the Action panel
- Go to the Design tab
- Use the panel on the left side of the screen
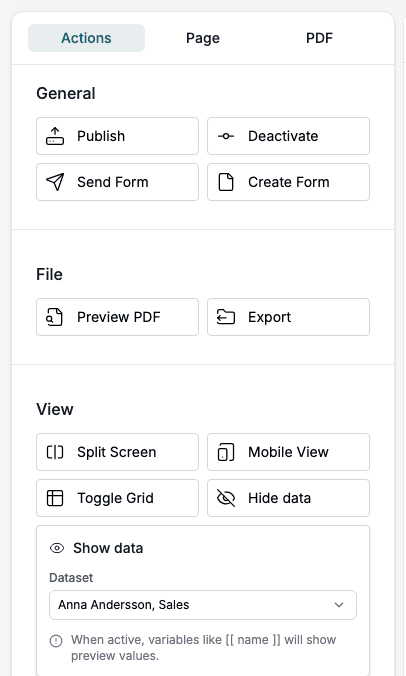
Action buttons
The following actions are available:
| Category | Button | Description |
|---|---|---|
| General | Publish | Make your changes live in Development as a new version. See Deployment to move it further |
| General | Activate | Make the published Smartform available for use |
| General | Deactivate | Disable the active Smartform |
| General | Send Form | Send the Smartform to recipients |
| General | Create Form | Opens the Create dialog, where you choose the Environment, the Language and, when the Smartform has datasets, the Dataset. Then Studio opens a new instance of the Smartform in a new browser tab. See Test your Smartform |
| File | Preview PDF | View how the Smartform will look as a PDF |
| File | Export | Download the Smartform as a file |
| View | Split Screen | Show the editor together with Data or PDF view |
| View | Mobile View | Preview how the Smartform looks on mobile devices |
| View | Toggle Grid | Show or hide the layout grid to help alignment |
| View | Show data | Show preview values in place of variables such as [[ name ]]. Under Dataset, choose Shadow data or one of the form’s datasets. Click Hide data to turn it off. Studio remembers your choice for as long as the browser tab stays open. The button is not offered when you edit a Smartform template. |
Typical usage
A common workflow when working with Smartforms:
- Make changes in the Design view
- Click Publish to make your changes live in Development as a new version
- Click Activate to make it available
- Use Create Form to test the Smartform. Studio publishes your changes to Development and activates the Smartform for you when that is needed
- Use Preview PDF if the Smartform will be exported