Section properties
A section groups rows and elements on the page. Its Properties panel holds the settings that belong to the whole section: its name, the link to an object, its look and spacing, and whether it is shown on the screen or in the PDF. For the settings of rows, columns and elements, see Properties.
Open the section properties
- Hover over the section in the editor.
- Click the section icon at the top left of the section.
The right panel opens the Properties tab with the settings of that section. You can also click the three dots (⋯) to the right of the section and choose Properties.
The panel has these groups:
| Group | What it holds |
|---|---|
| Information | The Type (Section) and the Name of the section. A rule can point at a section by its name, so keep names clear |
| Template | The link to an object. Only sections that come from an object have this group. See Sections from an object |
| Style | Background resource, background image, background color, border, border color and rounded corners |
| Placement | Margin, Padding and Gap. Gap is None, Small, Medium, Large or Extra Large |
| HTML Settings | Exclude from HTML |
| PDF Settings | Exclude from PDF, Line space and Page break |
Sections from an object
When you add an object from the Objects tab, the new section keeps a link to the object it came from. The link is shown in the Template group of the section:
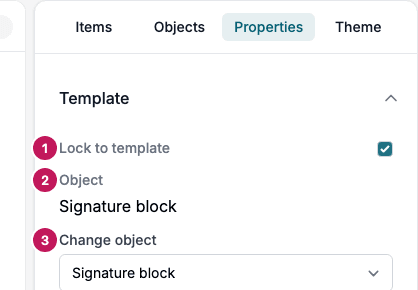
- Lock to template. When it is on, the content of the section follows the object. Studio reads the section from the object each time the Smartform is opened, so changes to the object reach the section. Edit the content on the object, because content you change in the section is replaced by the content of the object. A section that you add from the Objects tab starts with Lock to template on. When you turn it off, the section keeps its own content and you can edit it, but it remembers which object it came from.
- Object. The name of the object the section is linked to. If the object has been deactivated or deleted, this shows Not available and the ID of the object.
- Change object. Choose another object for the section.
While Lock to template is on, the panel of the section shows only the Template group. Turn Lock to template off to get all the groups of the section.
An object that is read-only is not offered in Change object, and a section from a read-only object shows Template is read-only and nothing else.
Change the object of a section
- Select the section and open the Template group.
- Choose the new object under Change object.
If the section is locked, Studio asks you to confirm.
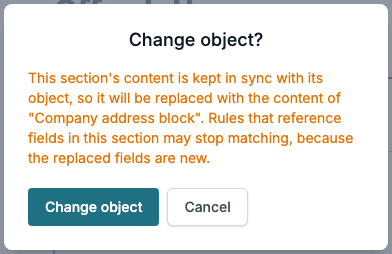
The content of a locked section is kept in sync with its object, so choosing another object replaces the content of the section with the content of the new object. Rules that reference fields in this section may stop matching, because the replaced fields are new. Check the Show/Hide rules that use the section afterwards. Click Change object to go on, or Cancel to keep the section as it is.
If the section is not locked, the change happens at once and the content stays as it is. Only the link changes. The new object is used the next time you turn on Lock to template.
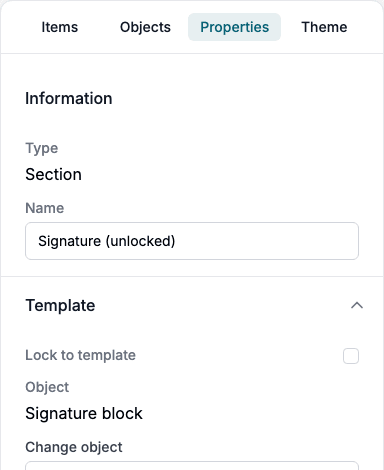
The section keeps its own name and ID, so rules that point at the section itself still find it.
If the list of objects cannot be loaded, the panel says The object list could not be loaded, so there is nothing to choose from. If the change fails, it says The object could not be changed. Try again.
Show a section on the screen or in the PDF
A Smartform has two outputs: the form on the screen and the PDF. Two settings decide whether a section takes part in them. The settings are independent of each other.
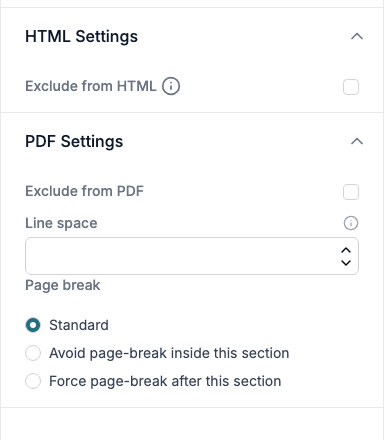
HTML Settings
Exclude from HTML hides the content of the section on the screen. It hides what is in the section, not only empty or unused fields. The section is still in the PDF, unless you also turn on Exclude from PDF.
Use it for content that only belongs in the document, such as a legal text that the person filling in the form does not need to read on the screen.
PDF Settings
| Setting | What it does |
|---|---|
| Exclude from PDF | Leaves the section out of the PDF. The section is still shown on the screen, unless you also turn on Exclude from HTML |
| Break safety margin | Only shown when you edit a header or footer template, where it controls the safety margin of the page break |
| Line space | Sets the line spacing of the section as a multiplier from 1 to 5. Leave it empty to use the default |
| Page break | Standard lets the section break over pages as needed. Avoid page-break inside this section tries to keep the section on one page. Force page-break after this section starts a new page after the section |
Line space and Page break cannot be changed while Exclude from PDF is on, because the section is not in the PDF.
The combination of the two settings:
| Exclude from HTML | Exclude from PDF | The section is shown |
|---|---|---|
| Off | Off | On the screen and in the PDF |
| On | Off | Only in the PDF |
| Off | On | Only on the screen |
| On | On | Nowhere, but it is still in the design |