Distribution Lists
A Distribution List is the set of ways a finished document can be sent on, for example Send by e-mail or Send by post. A Doc Composer form that has a Distribution List shows a Distribute document button instead of Submit. When the person clicks it, they pick one of the ways in the list, fill in its details and the form hands the choice to a workflow. The form therefore needs a workflow connected to it.
You make and manage the lists under Templates → Distribution Lists in Studio. This page is about the Distribution Lists in Studio. Pages Manager has its own distribution lists for Pages logic files, see Distribution.
📝 Note: A Distribution List only offers choices. It does not send anything itself. The workflow connected to the Smartform does the sending.
How it works
Four things work together:
- A Distribution object holds the fields for one way of sending, for example the recipient’s e-mail address. You make it under Templates → Objects with the type Distribution.
- A Distribution List groups the Distribution objects people can choose between.
- The Smartform’s Page tab points at the list.
- The person filling in the form chooses one object in the Distribute Document window, and the workflow receives that choice.
1. Create a Distribution object
- Go to Templates → Objects and click Create Object.
- Enter a Name, for example
Send by e-mail. - In Type, choose Distribution, then click Create.
- Design the fields people must fill in when they choose this way of sending, for example Recipient name and Recipient e-mail. Designing an object works like designing any other object. See Using objects.
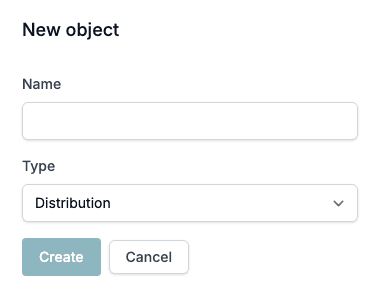
Distribution objects are only used by Distribution Lists. They are not offered as section content in the designer.
2. Create a Distribution List
- Go to Templates → Distribution Lists.
- Click New Distribution List, enter a Name and click Save. The list opens in the editor. Click Close to leave without creating it.
The list is created in the folder you are viewing. In Private Folders → Home you only see the lists you made yourself. Lists in a shared folder are visible to everyone in the company. See Folders for how folders work.
The screen shows:
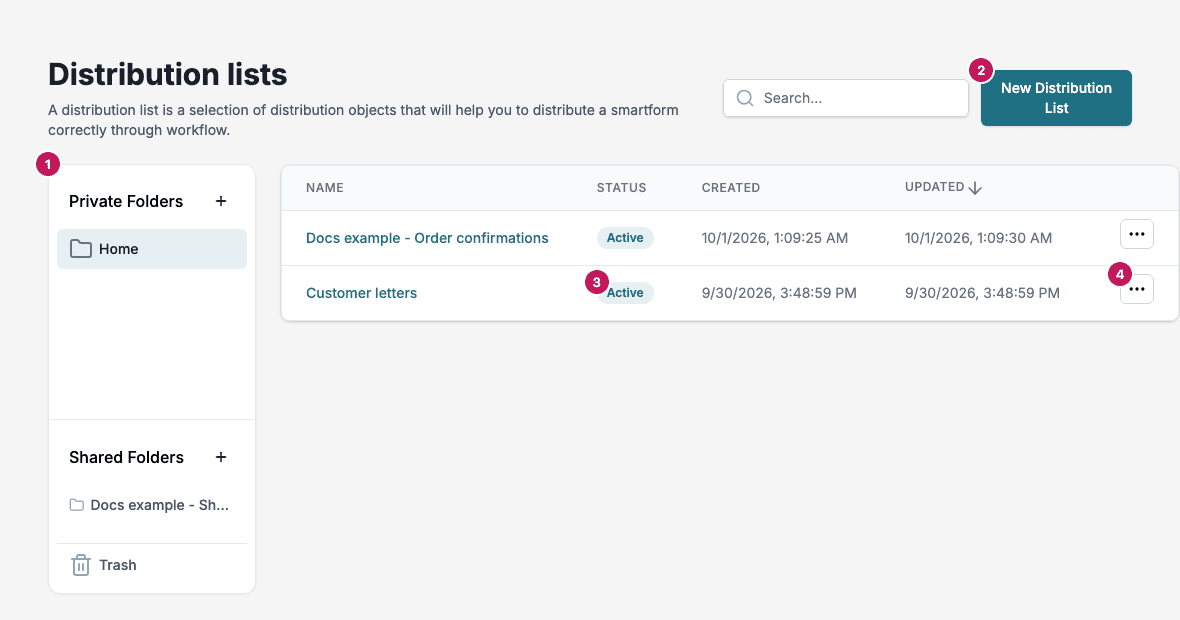
- The folder panel: Private Folders, Shared Folders and Trash.
- New Distribution List.
- The Status of each list, Active or Inactive.
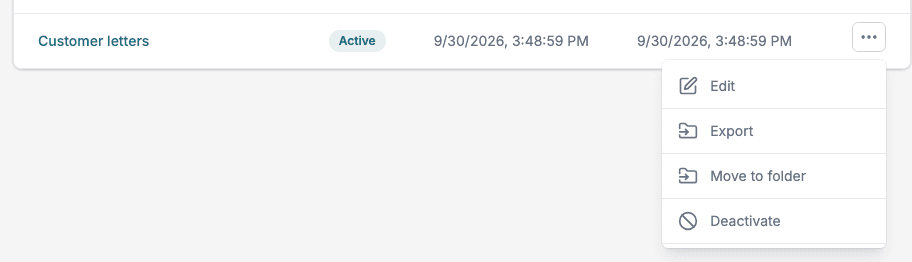
- The row menu with Edit, Export, Move to folder, Deactivate or Activate.
Use Search to find a list by name, and click a column heading (Name, Status, Created or Updated) to sort.
3. Choose the objects
- Open the list by clicking its name, or use Edit in the row menu.
- Change the Name if you like.
- Under Distribution Objects:, click an object. A + button appears. Click it to add the object to Selected Objects. You can also drag the object into Selected Objects.
- Drag objects up or down in Selected Objects to set the order people see them in.
- To remove an object, click it in Selected Objects and click the trash button, or drag it out of the list.
- Click Save. Reset puts the list back as it was when you last saved.
Save stays grey until you change something and the name is filled in. Until you add an object the list shows No objects selected. Drag items here. Only active Distribution objects are offered on the left. An object that is no longer available shows as (Unavailable).
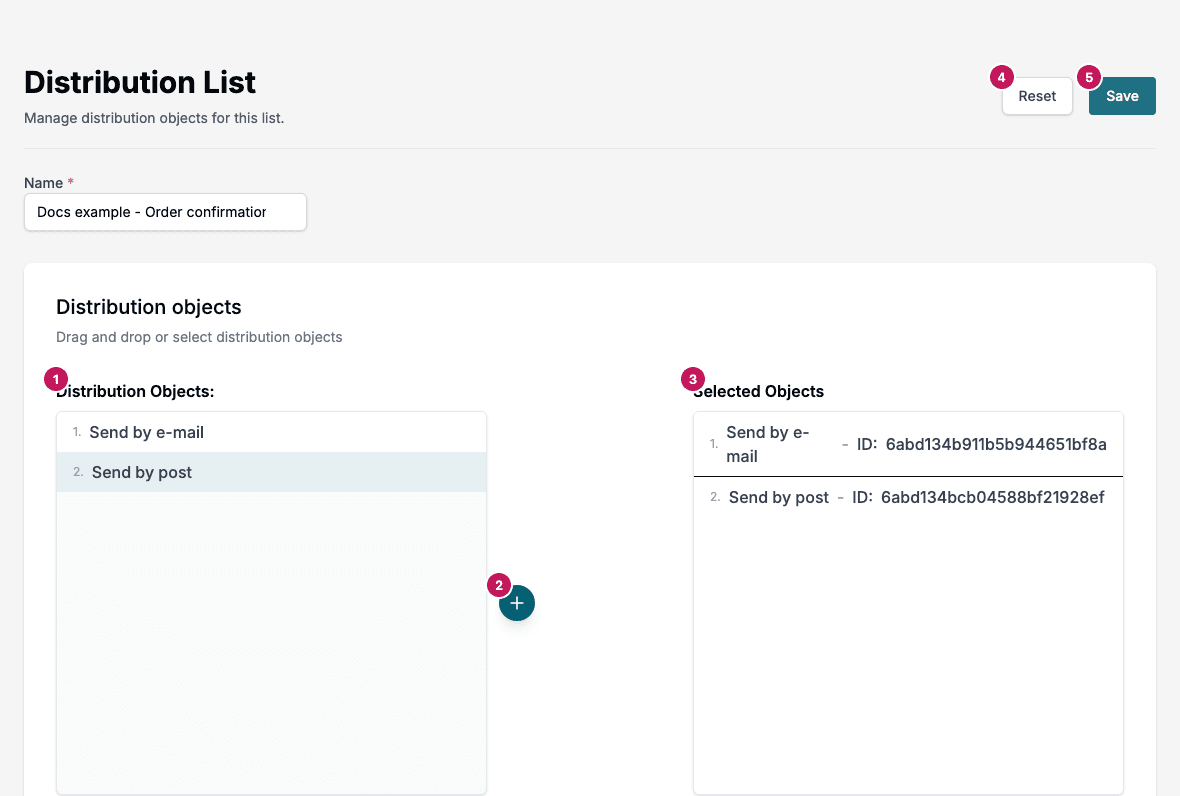
- Distribution Objects:, the objects you can choose from.
- The + button that adds the selected object.
- Selected Objects, in the order people will see them.
- Reset.
- Save.
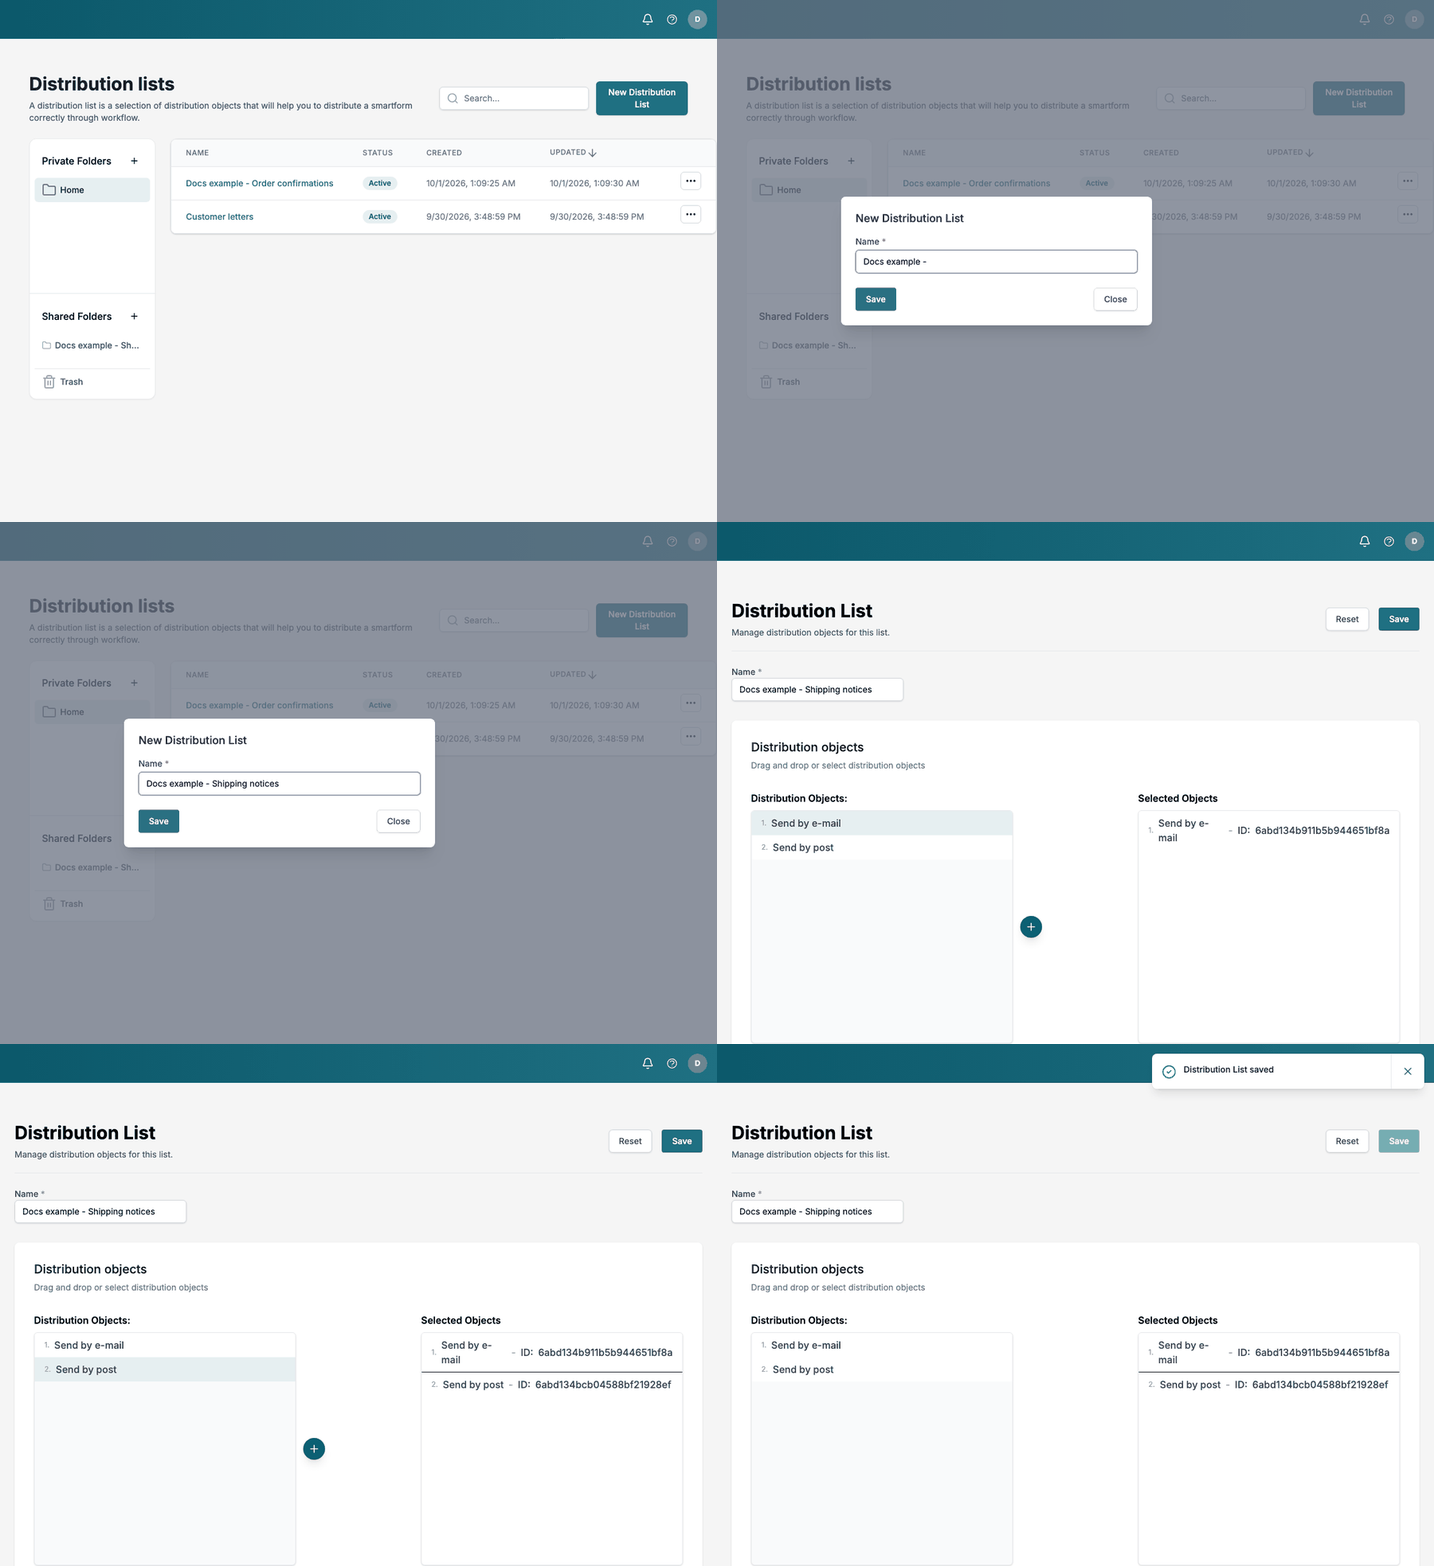
This is the whole task, from a new list to a saved one:
4. Use the list on a Smartform
- Open the Smartform in the designer and select the Page tab.
- In Type, choose Doc Composer. The fields Toolbar and Distribution List appear.
- In Distribution List, choose your list.
The field offers Submit and every list with the status Active. Submit means the form has no Distribution List and people simply submit it. Studio saves each change as you make it. Set Up the Doc Composer shows the whole Page tab.
If the list is removed later, or cannot be read, the form still opens and its button works as Submit.
What people see
In a Doc Composer form that has a Distribution List, the send button at the end of the toolbar is called Distribute document.
- The person clicks Distribute document. The form first checks the required fields and the validation rules. The window does not open until they pass.
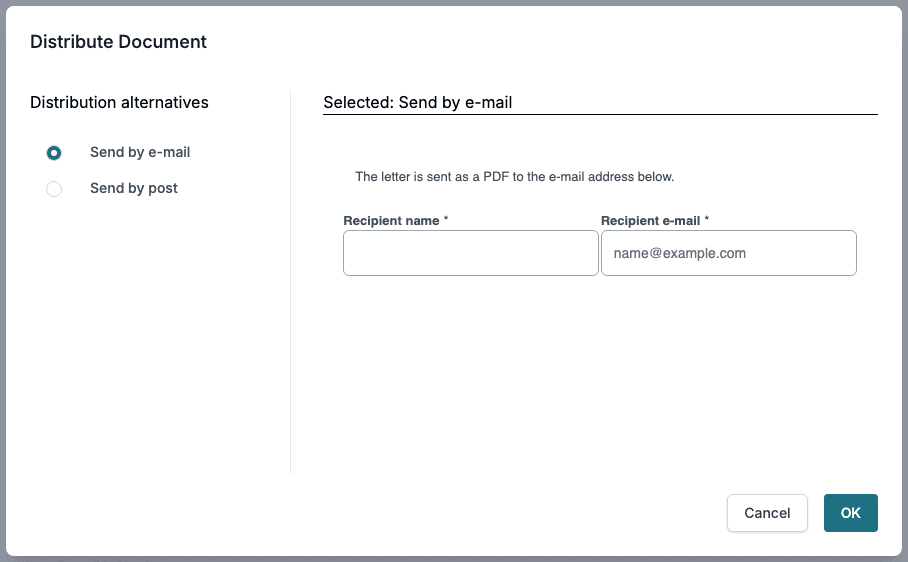
- The Distribute Document window opens. On the left, Distribution alternatives lists the objects of the list as radio buttons, and the first one is selected. On the right, Selected: and the name of the object show that object’s own fields.
- The person fills in the fields and clicks OK, or clicks Cancel to go back to the form.
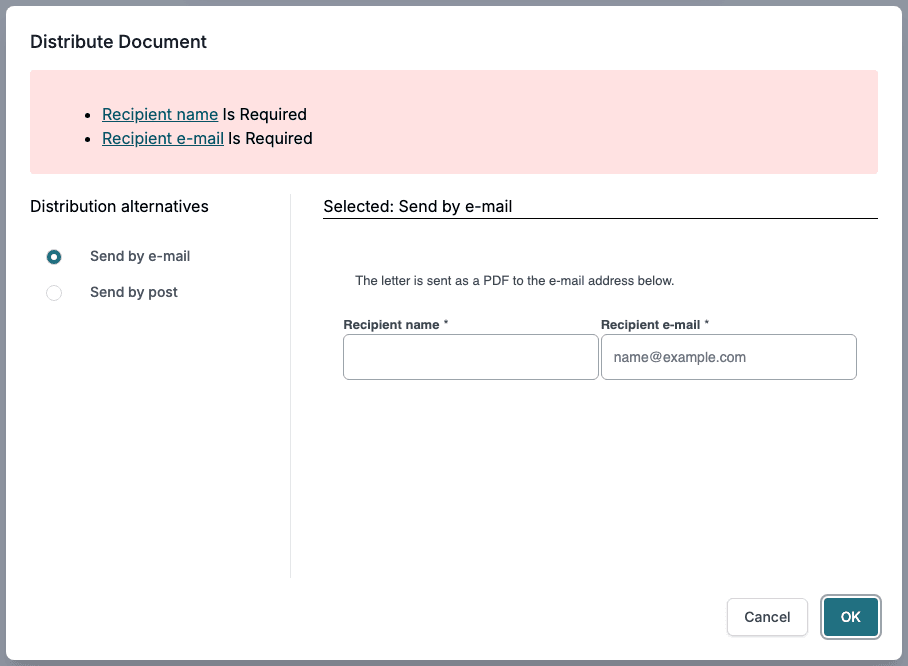
OK checks the choice before it closes the window. The window lists what is wrong:
- No distribution alternative has been selected.
- The selected distribution alternative is invalid. This happens when the object behind the choice is no longer available.
- Each required or invalid field of the chosen object, as a link to the field.
When the checks pass, the form saves the chosen alternative and the values typed into it, and the form is completed. The connected workflow continues with these values. A workflow step on the Smartform offers them as Distribution ID, Distribution Name and Distribution PDF file. The fields of each object in the list are also offered, named after the object and the field’s property, for example Send by e-mail - email for a field with the property email.
If no workflow is connected to the Smartform, Distribute document shows No workflow is associated with this smartform. and the window does not open.
Manage your lists
Open the row menu of a list:
- Edit opens the editor.
- Export downloads a JSON file with the list’s name and its objects, for use in a Doxis package. See Doxis packages.
- Move to folder moves the list to another folder, or to Trash.
- Deactivate or Activate changes the status. Only Active lists can be chosen on a Smartform’s Page tab.
- Delete is shown only inside Trash. To delete a list, move it to Trash first.
Lists that are in use
Deactivate, Move to Trash and Delete are refused while a Smartform uses the list. Studio shows Cannot deactivate distribution list, Cannot move distribution list to Trash or Cannot delete distribution list, and names each Smartform that uses it with an Edit link.
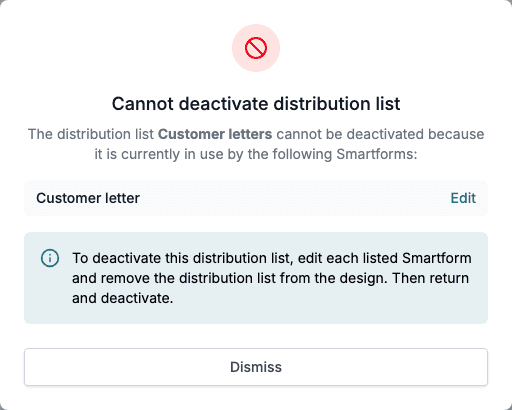
- Click Edit next to a Smartform to open it in the designer.
- On the Page tab, set Distribution List back to Submit, or choose another list.
- Return to Distribution Lists and repeat the action.
Click Dismiss to close the dialog without changing anything.